If you’re using Red Hat Ansible Automation Platform (AAP), chances are your automation estate isn’t static. Teams grow. Infrastructure expands. Workloads shift across clouds and datacenters.
Often, AAP customers can benefit from the convenience of simply applying their username/password in the Settings | Subscriptions area of their AAP controller, and selecting the full AAP subscription that best fits their environment. However, in cases where multiple AAP controller deployments are being used (e.g., across multiple datacenters, or unconnected hybrid cloud environments, etc.), you may need to implement a different subscription allocation strategy.
By learning how to create and import Red Hat Ansible subscription manifests, you unlock perhaps one of the most underrated benefits of a Red Hat subscription: the ability to precisely control your managed AAP nodes from wherever it will deliver the most value.
What’s a Subscription Manifest?
A subscription manifest is a digitally signed .zip file that tells AAP which subscriptions and entitlements you’ve allocated. It’s required to activate AAP and ensures you’re using your Red Hat subscription in a compliant and auditable way.
Why Manifest Portability Matters
In dynamic environments, you don’t always want your node entitlements locked into the exact place you first deployed AAP. With manifests, you can:
- Shift automation workloads to be managed by AAP controllers which are local to where those workloads are running now
- Recover quickly in disaster scenarios, without having to maintain complicated HA schemes
- Avoid over-purchasing by dividing your subscription entitlements into right-sized increments
- Properly support air-gapped AAP deployments
Now, let’s walk through the official Red Hat-recommended process for obtaining and using these manifests.
Step-by-Step: Create and Download Your First AAP Subscription Manifest
Reference: AAP Docs – Obtaining a Manifest File
1. Log into Red Hat Customer Portal
Go to the Red Hat Customer Portal Subscription Allocations page using your admin account.
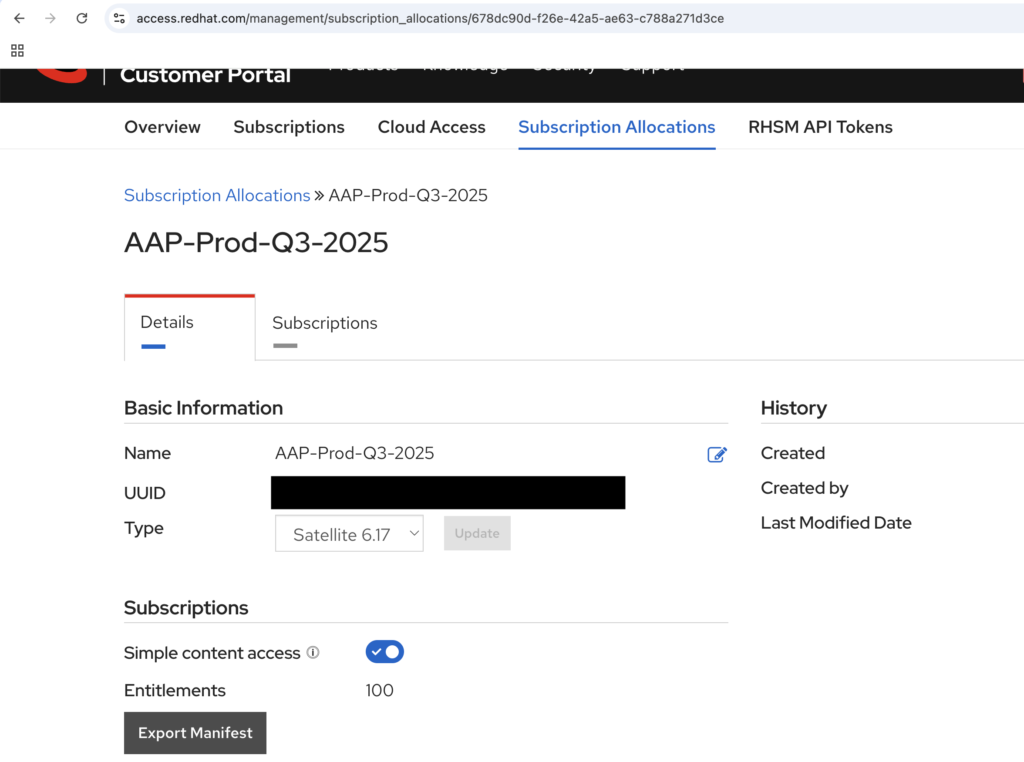
2. Create a Subscription Allocation
Before you can download a manifest, you must first create a subscription allocation.
Procedure:
- Click New Subscription Allocation
- Give it a meaningful name (e.g., “AAP-Prod-Q3-2025”)
- Under Type, select:
Satellite [LATEST] - Click Create
(This is also how you would prepare manifest files for air-gapped or offline systems.)

3. Add AAP Subscriptions to the Allocation
With the allocation created, it’s time to add your desired subscription entitlements.
Procedure:
- From the Subscription Allocations page, click your new allocation name
- Navigate to the Subscriptions tab
- Click Add Subscriptions
- Enter the number of Ansible Automation Platform Entitlements you need
- Click Submit
Pro Tip: Only assign what you need for a given controller deployment—you can export and reuse manifests later if your workload moves.
4. Export the Manifest File
Once your allocation has the right entitlements:
Procedure:
- Still on the allocation page, under the Subscriptions tab
- Click Export Manifest
This downloads a file named something like:manifest_AAP-Prod-Q3-2025_20250603T234108Z.zip
Save this file—it’s your key to activating AAP anywhere you need it.
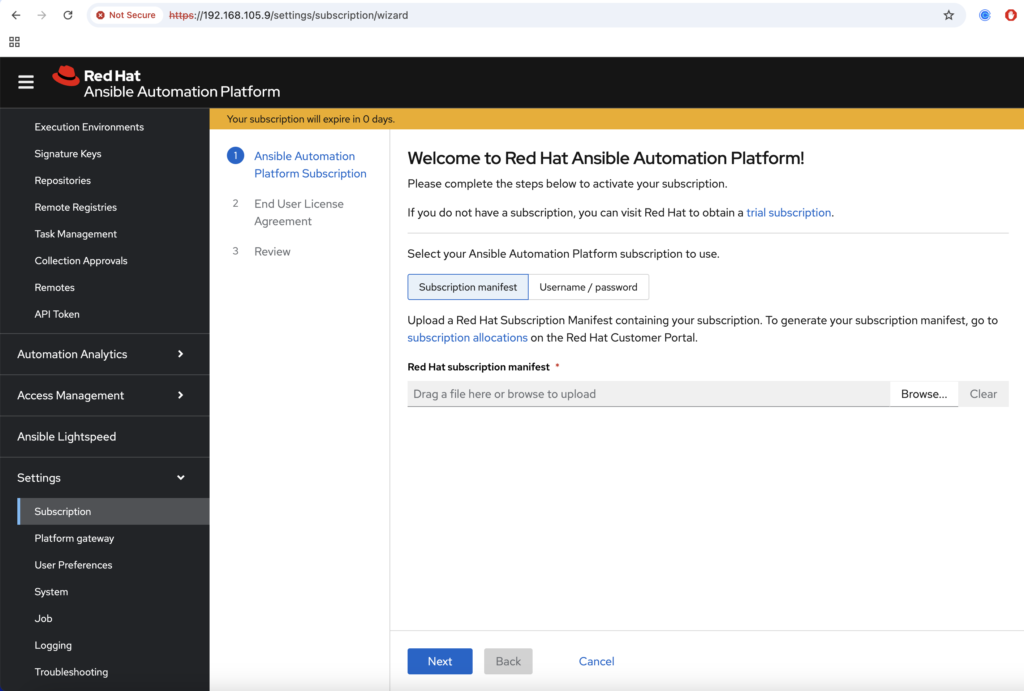
5. Upload Subscription Manifest to AAP
Now log into your AAP Controller UI (new or existing instance):
Procedure:
- Go to Settings → Subscription
- Click Browse, select the
.zipfile you downloaded - Click Upload
Done! Your AAP controller is now fully licensed and activated with your subscription.
In Summary
Your AAP subscription is more than a license, it’s a tool.
Learning to allocate, export, and import manifests means you’re no longer bound to yesterday’s network topology. You can automate wherever the value is now—cloud, datacenter, edge, or all of the above.